- Digital Audio Data Compression (e.g. MP3, AAC, etc.)
- Audio Level Compression (Dynamics Control)
In this context we are talking about the second process — dynamics control. Dynamics control is the process of automatically adjusting the volume control on an audio channel. The gain level of the channel is automatically adjusted by the process based upon the level of the audio signal passing through the processes detector. A compressor is a dynamics control processor that lowers the volume of the signal when the overall level of the signal increases. As a result, it tends to moderate or compress the dynamic range of the signal.
Compressors have a huge number of applications. They can be used as so-called “leveling-amplifiers” or automatic gain controls, which tend to keep the overall volume of the material constant. They can be used as limiters, which ensure that no matter what the level of the input signal is, the output level will never go above a specified level. They can be used to simply limit the overall dynamics of the signal, or they can be used to creatively change the timbre of the signal.
Most of the various applications can be accomplished by adjusting the parameters of the compressor; some applications depend on how the compressor is implemented. Depending on the compressor’s implementation, it may not be possible to actually achieve all modes of operation by adjusting the parameters. For example, many compressors (including the one in ChannelStrip) are not terribly effective as limiters; the limiting process may require a different approach to computing and applying the gain than a specific compressor provides.
- Threshold
- Ratio
- Knee
- Character
- Attack Time
- Release Time
- Input Gain
- Makeup Gain
- Auto gain
- Output Ceiling
- If the input level is -40 dB, the level is below threshold, and the output level will be -40 dB.
- If the input level is -30 dB, the level is just at threshold, and the output level will be -30 dB.
- If the input level is -20 dB, the level is 10 dB higher than the threshold, and the output level will be -30 dB + (10dB/5) or -32 dB. In other words the compressor will only let the output go up 1dB for each 5 dB the input goes above the threshold.
- One meaning of sidechain is an independent input feeds the detector, and can be connected to any arbitrary signal source. When the compressor has this kind of sidechain it can be used to implement things like duckers.
- The second meaning of sidechain is that the compressor has an additional integrated signal processor between the input signal and the detector. This signal processor is usually an EQ, and it allows you to make the compressor react in a frequency-sensitive way.
These parameters tend to be highly interactive, but let’s examine each one in turn.
Threshold allows you to set the level at which the detector will begin to cause the compressor to reduce the gain of the signal that is running though it. Basically, if the input signal (or the detector source if you are using a compressor with a side chain) is below the threshold level, the gain cell in the compressor will not change the signal level (but see “Knee” below for some more details). If the detector level is above the threshold, the compressor will compute an attenuation (in other words, a gain reduction) to apply to the signal based upon the detector level, the ratio and the knee parameters. The threshold sets where the action starts; the other parameters control what happens once the compression is in effect.
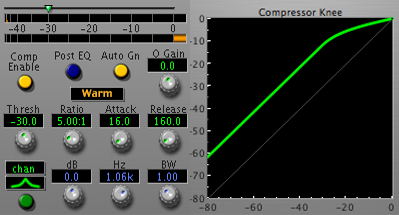
Ratio allows you to control the ratio of the change of input level to the change of output level, when the signal is above the threshold. This ratio is specified in dB. So, for a standard compressor, the ratio for the compressor below threshold is 1:1. This means that for every dB the input signal increases, the output signal also increases 1 dB. Once the detector goes above threshold, the ratio applied is the one that you set with the ratio control. This ratio only applies to the part of the signal that is above the threshold. So, if, for example, the ratio is set to 2:1, and the input signal is 2 dB above the threshold, the output signal will have only increased 1 dB above the threshold. To make this more concrete, let’s look at a hypothetical setting. Assume the compressor threshold is set to -30dB, and the ratio is set to 5:1. Let’s figure out what the output level will be for a variety of input levels:
The ratio allows you to control by how much the dynamics will be limited. The threshold lets you control at what point in the signal level the effect will begin to act.
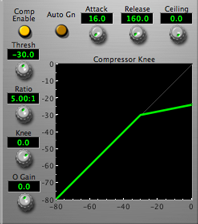
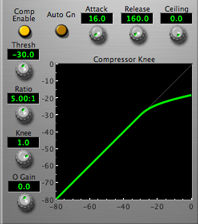
Many compressors only have a limited number of ratio settings. Often limiters only have one setting — ∞:1. This ratio is known as a brick-wall limiter, because the output level never goes above the threshold. For compression, generally ratios between 1:1 and 20:1 are useful. If the compressor has a soft knee, higher ratios can often be used to great effect.Knee is a parameter that only appears on some compressors. Sometimes it is labeled as Soft/Hard Knee. Sometimes it is a continuous control that allows you to morph between soft and hard knees (for example the knee control in the MIO Compressor). Some compressors only have hard knees. Some only have soft knees (like ChannelStrip). A hard-knee compressor is one in which the compression ratio transitions from 1:1 to the set ratio abruptly at the threshold point. A soft knee compressor gradually transitions from the 1:1 ratio to the set ratio as the level transitions past the threshold. Some soft knee compressors (like the MIO Compressor) have a 1:1 ratio below the threshold and only start to apply gain reduction after the input level goes above the threshold. Other soft knee compressors (like ChannelStrip) actually start to transition from the 1:1 ratio below the threshold. This means that these compressors will actually start compressing the signal below the threshold. It is part of the character of those processes. Soft knee compressors tend to have a smoother sound; this can be very appropriate for certain types of compression — particularly when you don't want to “hear” the compressor working. Hard knees can be very effective when you are using the compressor as a signal transformation tool where you do want to hear the effects of the compressor.
Many compressors have a Character control although it may not be labelled as such. Sometimes it will be labelled as Opto or some such semi-descriptive name. The ChannelStrip compressor has an explicit Character control. These types of controls have an effect on the inner workings of the compression algorithm and usually have a substantial effect on both the distortion introduced by the compressor and the reactivity of the compressor. Usually, this is not a parameter that can be understood — instead, it is best to think of it as something that needs to be experienced to understand what effect it will have. We have tried to make the Character control on ChannelStrip descriptive; the setting names should give you some idea of the effects of changing this control.
Attack Time allows you to control how quickly the detector will react to changes in the input level. When the attack time is set to a small value, the detector will react quickly to increases in the input level. This will allow it to compress transients quickly, but will tend to increase the distortion introduced by the processor. Short attack times are consistent with using a compressor in a limiting or an effect application. Longer attack times will allow short transients to pass through the compressor unaltered; this kind of setting is more appropriate when using a compressor in a leveling application; it makes it so that the compressor will react to longer term changes in levels and not try to follow the short-term dynamics of the material.
Release Time allows you to control how quickly the detector falls back from the peak detected levels. When the release time is short, the compressor will remove gain reduction quickly; in other words it will only tend to act on the short transient high-level material, and will quickly return to no gain reduction as the signal level decreases. This can be used along with makeup gain to significantly reduce the dynamics of the signal and as a result increase the overall loudness of the signal. If the release time is too short, the compressor will actually follow the shape of the waveform and will introduce significant audible distortion. If you are using the compressor in a leveling application, longer release times are appropriate (even into the seconds), as you don't want to introduce distortions or abrubt level changes. Again, short release times will tend to greatly effect the timbre of the signal; as a result, you will tend to want to use shorter release times when you are using a compressor as an effect to change the basic nature of the signal being processed. For example, both short attack and release times are appropriate for use on drum signals as they tend to moderate the initial short transient, and bring up the tone and detail of the body of the sound as the drum hit decays away.
Input Gain is available on some compressors, and it applies gain to the signal before the detector and gain cell of the compressor. It is often called "drive" on the compressors that offer it as a parameter. Usually compressors with a drive control have a fixed threshold and knee, and the amount of compression applied is controlled by how hard the signal is driven into the compressor.
Makeup Gain allows you to set the gain that is applied to the signal after the compression has been applied. Since the compressor reduces the gain of the signal above the threshold, the overall signal level drops as it passes through the compressor. While this is sometimes what you are after (for example if you are trying to level the program material to a consistent level — say, for use as background music in a café), often you want to use the compressor to reduce the dynamic range of the material without reducing the peak level. This has the effect of increasing the loudness of the material because the dynamic range is compressed up to the top of the range, instead of limited to the lower portion of the range. In order to do this, you must apply gain to the compressed signal to move it to the top of the range. See also Auto gain below.
Auto gain is available on some compressors (including ChannelStrip and the MIO Compressor), and when enabled, will cause the compressor to automatically estimate the proper make-up gain required to make it so that full-scale input levels generate full-scale output levels. In the Metric Halo compressors, the Makeup Gain control is still active; it is used to trim the output level from the automatically computed gain.
Output Ceiling is generally only available on limiters. It specifies the absolute maximum level of the output signal from the limiter. This is useful to ensure that the output signal level does not exceed some specified safety level.
The compressors in ChannelStrip and MIOStrip actually implement both types of sidechains; the sidechain can be fed from an external key input or the input signal and the processors integrate a sidechain EQ before the detector.
Having an EQ integrated into the detector is particularly useful, because it allows you to make the compressor more or less sensitive to certain frequencies. This can be used, for example, to make the compressor act as a de-esser. By acentuating the cluster of frequencies up in the 8-12kHz region (where the ess sound of sibilance is most prevalent), you can configure the compressor to lower the volume of sounds that have substantial energy in the "ess" range. Similarly, you can use the sidechain EQ to enhance the response to the low end when compressing bass or bass drums. Another useful application of side-chain EQ is to cut the response of the compressor to a range of frequencies; one aspect of compression is that it tends to dull the signal; often rolling off the high-end of the sidechain (with a high cut filter) can provide useful compression of the low-end without dulling the high-end.
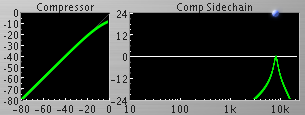 De-ess at 8KHz |
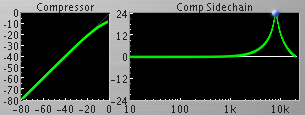 De-Ess & Compression at 8KHz |
The above examples show the differences the filter choice of the side chain detector can have. The 1st example (left) has a Bandpass filter in the sidechain detector. While the 2nd example (right) has a peaking filter in the sidechain detector. The compressor settings for both examples are identical but the output will be vastly different.
ChannelStrip, Metric Halo, and ChannelStrip for GarageBand are trademarks of Metric Halo Distribution, Inc.
GarageBand, AudioUnits, Macintosh, Mac OS X, Apple and Apple Computer are all trademarks of Apple Computer, Inc.
and are used to denote compatibility with certain product offerings of Apple Computer, Inc.
All other trademarks are the property of their respective owners and are used for comparison purposes only.

