Tech Note #8: How to use your 2d Expanded MIO as a front end for Pro Tools LE, M-Powered or PTHD
By Allen Rowand & Marc Schonbrun
Revision 1.0 - October 19, 2009 - based upon Technote #0001
This tutorial is going to show you how to use the pristine MIO interface as a front-end for your Pro Tools system. For this to work, you'll need a few things:
- A Pro Tools system that accepts digital inputs (S/PDIF or ADAT)
- The appropriate digital interconnect cables
- Your MIO
For this demonstration, we are syncing up a ULN-2+DSP to a M-Audio Firewire 410 running Pro Tools M-Powered 7.3.1cs2. The procedure will be remarkably similar, if not identical on a PTLE system (Mbox – 002 – 003).
Note: If you are using a 2882, please see the "additional notes" at the end of this document for details on Pro Tools systems that take advantage of your extra I/O.
Why use a ULN-2 with a high end Pro Tools HD system?
The ULN-2 provides state of the art D/A A/D conversion with the finest pres built into any interface at an absurdly low price. You can easily patch in the ULN as a standalone converter for your HD rig or use the ULN-2 for critical analysis through Metric Halo's award winning SpectraFoo application.
First step: Make the necessary digital cable connections
- ULN S/PDIF Out -> Pro Tools Interface S/PDIF In
- ULN S/PDIF In -> Pro Tools Interface S/PDIF Out
Note: While S/PDIF connections resemble RCA/unbalanced connections, they are a special 75Ω digital interconnect cable. Make sure you use the appropriate digital interconnect.
Now that you're physically connected, let's start with the familiar MIO Console to get our routing.
Launch the MIO Console and go to the Mio Console window. First, make sure that Digital Input (DI) Source is set to S/PDIF:

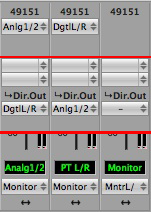
and then go to the Mixer window. This is where we will set up the routing from the MIO into your Pro Tools interface. I've created a stereo bus called "Monitor", and assigned Analog 1/2 and Digital L/R to it. I've changed the labels of Digital L/R to PT L/R. Look at Figure 1.1 below for a visual reference.
On the left side of the mixer, I have set up the routing so that our two analog inputs from the ULN-2 output to the S/PDIF outputs using a direct out. The D.O. is post-insert, so that we can access Character and plug-ins (if available) before sending the audio to ProTools. Since I'm using the converters on the ULN-2 to monitor Pro Tools, I have sent PT L/R to output on Analog 1/2. This will give me meters on the front panel. Finally, the Monitor bus is set to output on Monitor L/R, which will let me listen on headpones and the monitor outputs
At this point, you are almost done with the MIO Console. You will control the gain and other functions through the analog front panel of the ULN-2 as you always have. The last place to check is the "Analog I/O" control window to make sure that your sample rate is set correctly. In the sample rate box, please select the sample rate for your upcoming Pro Tools session.
Before we go to Pro Tools, we should talk about "standalone" operation of the ULN-2.
Standalone Operation
The ULN-2 is unique because it can operate as a standalone converter/mic pre/interface, without the need for any FireWire connection or running MIO Console on your computer. This is done through the "Snapshot" feature of the ULN-2, which allows you to save the state of the console into memory, such as routing and sample rate and recall them from the front panel buttons, all without the need for a computer. To do so, once you've configured the MIO for your Pro Tools routing, go to the "Utilities" pull-down menu and select "Save Snapshot 1 State". This will save the MIO configuration into memory in the ULN-2 itself. Once saved, you can access this snapshot (up to nine different console states) from the front panel snapshot controls, which are located directly to the left of your input meters. A pair of soft press buttons will enable you to browse through the nine snapshot states of your ULN-2 – all without a computer!
Power
When running the ULN-2 as a stand alone converter, you will need to power it either from the included AC power adapter or through the 4-pin battery port using a broadcast battery for truly "remote" recording.
Now that that's done, we can go to Pro Tools and start setting the controls there.
Launch Pro Tools
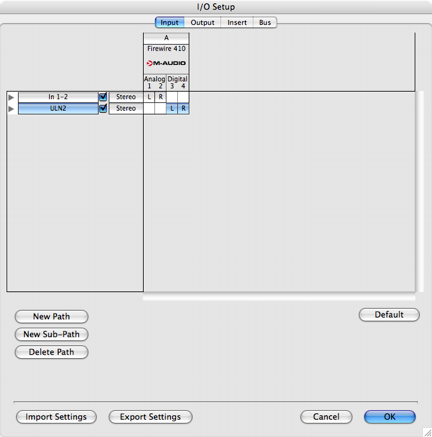
Create a new session and for the time being, don't create any tracks. The first spot we need to open is the "I/O" menu in Pro Tools, under the "Hardware" pull-down menu. Doing so brings us this first window, Figure 1.2: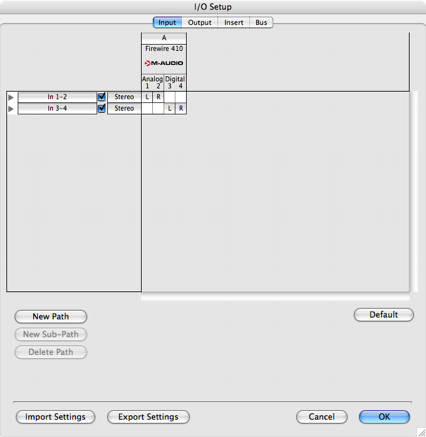
This window shows us that the digital inputs are assigned to inputs 3 and 4. To make our life easier, PT allows us to rename these inputs. If you double click on the name "In 3-4" you'll be able to rename it. I choose "ULN-2" to make track assignments easier in the future.
In the same I/O setup window, there are a few tabs across the top of the screen. The next tab to look at is the "Outputs" tab. Doing so brings up Figure 1.3:
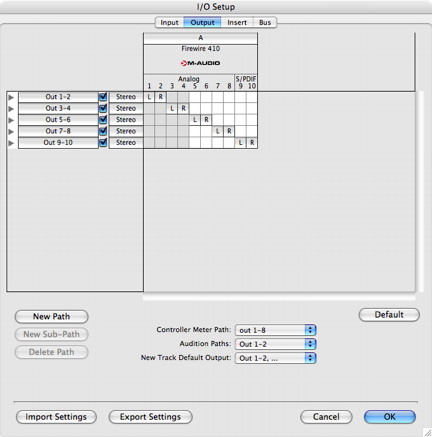
The S/PDIF output is assigned to Out 9-10, and just like the previous window we can rename the outputs for easier assignment later by clicking on the name and providing our own name as seen in Figure 1.4
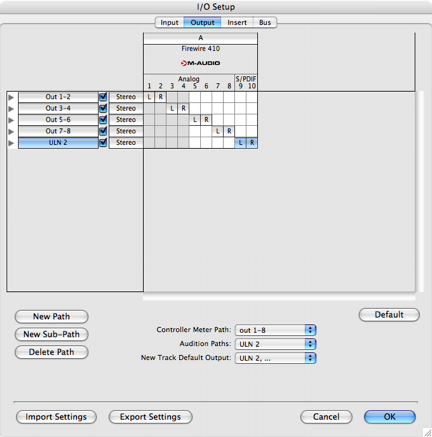
In this same window, we can change one more thing to make our life a bit easier. On the bottom of that window, under "New Track Default Output", we can change the default output of any newly created track to "ULN-2", or whatever you've chosen to name your track. This means that any new track you create in your Pro Tools session will automatically create the proper output to the ULN.
Now that that's setup, we have to check a few things on the M-Audio 410 itself and then we can start recording.
Under the same "Hardware" pull-down menu, please select "Hardware Setup". Doing so will give you Figure 1.5
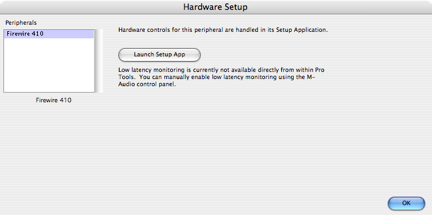
If you are using PTLE, you'll be able to configure the device directly from this window. In the case of PT M-Powered, there is still a separate setup application for the M-Audio interface. You can launce it directly by pressing “Launch Setup App”, which will bring you to the 410's control panel application as seen in Figure 1.6:
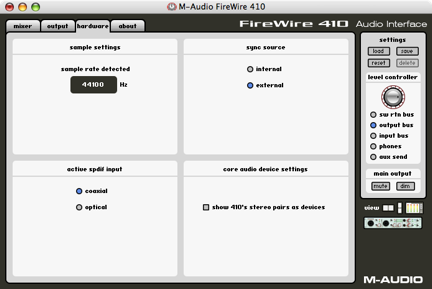
There are several tabs you can select in the application, but we only need to concern ourselves with the "Hardware" tab. In this tab you will find settings for S/PDIF and sync settings, which are crucial to what we're doing. Under the "Active S/PDIF Input", we chose the "Coaxial" selection because a 75Ω cable is a coaxial, and not an optical connection. The last setting we choose is the most important selection of all: sync source. The MIO is providing the high quality clock that Pro Tools will sync to through its digital S/PDIF connection. Since this is happening "externally" from the MIO, you must select "External" as your clock source with Pro Tools.
If the sync is not set properly, you will get clicks and pops and other errors. In most cases, Pro Tools will not enter record mode unless proper sync is present.
Setting Up Recording Tracks
Now that we've set up all the details within the MIO, PT and our interface, the next part is simple! Let's add a track to go over the track details. Figure 1.7 shows a stereo track I created in Pro Tools. I made sure that the "I/O" was shown in the track details. Otherwise, I can always go to the mixer to setup the inputs and output assignments.
Since we renamed our inputs and outputs, this next part is simple. Choose ULN-2 for your input and ULN-2 for your output and record enable the track. You will now be able to monitor the tracks inputs through PT's software metering. That's it. Now you can record to your hearts content!
Any subsequent tracks you add, whether they are analog tracks or virtual instruments will always use the ULN-2 as an output.
Note: You will always monitor through the ULN-2. The Pro Tools hardware simply acts as a junction box for the digital interconnects. Monitor from the front panel headphone amp or monitor outputs on your ULN-2. Record levels are set from the front panel analog controls of the ULN-2; changing the faders in Pro Tools will not reduce the incoming level or eliminate clipping, this must be done in the analog domain, before it hits the first A/D converter in the ULN-2.
Low Latency Monitoring
When you monitor through a host such as Pro Tools, there will be some latency incurred. By using the mixer in your ULN-2, you avoid this latency; you are listening to the analog inputs of the ULN-2 and the digital outputs of ProTools in the same mixer. This eliminates a round-trip of sending audio through ProTools, and no latency is incurred.
That's it! Now you can enjoy the familiar workflow of Pro Tools with the pristine converter and preamp quality of your ULN-2.
Additional Notes:
The following is a list of interfaces in the Pro Tools line that feature compatible S/PDIF or AES or ADAT digital connections.
- DIGI 001*
- Mbox*
- Mbox 2
- Mbox 2 Pro
- DIGI 002 Rack*
- DIGI 002*
- DIGI 003 Rack*
- DIGI 003*
- Audiophile 192
- Audiophile 2496
- Audiophile USB
- Delta 1010
- Delta 1010LT
|
- Delta 66
- Fast Track Pro
- Firewire 410
- Firewire Solo
- Firewire 1814*
- ProFire Lightbridge*
- ProjectMix I/O*
- HD 192*
- HD 96
- 882
- 888
- ADAT Bridge*
|
Notes:
- DIGI 001 not supported on all Pro Tools systems
- Original Mbox not supported on all Pro Tools systems
- DIGI 002/OO2 Rack, DIGI 003/003 Rack provides ADAT I/O for more channels of I/O with a Metric Halo 2882
- Firewire 1814 provides ADAT I/O for more channels of I/O with a Metric Halo 2882
- Profire Lightbridge provides ADAT I/O for more channels of I/O with a Metric Halo 2882
- ProjectMix I/O provides ADAT I/O for more channels of I/O with a Metric Halo 2882
- HD192 I/O provides ADAT I/O for more channels of I/O with a Metric Halo 2882
- ADAT Bridge I/O provides ADAT I/O for more channels of I/O with a Metric Halo 2882
Revision History:
- Revision 1.0 - October 20, 2008 - Revised for v5 based upon Tech Note #0001
|